Tag Archives: Strain Hardening Index
Tensile Testing
Tensile testing helps to determine basic load bearing capabilities of materials under tension. These properties are used in engineering and design of components and structures. Typical examples where these properties are used are design of guy cables that support bridge structure, wind turbines, aircraft wings and fuselage structures, etc. One can get several material parameters from a single tensile test. Yield strength, Ultimate strength, Ductility measured by percentage elongation and reduction in area are some of the basic material parameters one can get from this test. In addition, one can determine fracture behaviors of materials by analyzing fracture surfaces. It is the most basic type of material testing used in any material development or assessment for use. Further this test is simple to do and relatively inexpensive.
Types of Tensile Testing
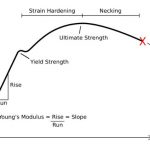
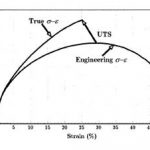 Two different types of tensile testing are available to assess material behaviors. These are uniaxial tensile test and biaxial tensile test. Most common test is uniaxial tensile test using smooth test samples, which helps to assess load bearing capacities of materials. In uniaxial tensile testing, a sample is pulled in one direction until failure. Load and displacement data are gathered using load cells and extensometers. These data are further converted and displayed as stress -strain curve. There are two ways the data are displayed, namely engineering stress -strain and true stress -strain data. Most commonly used data format is engineering stress-strain form (see figure above). This is obtained just by dividing load by original cross section area of the sample and strain is obtained by dividing displacement by the gage length. For most design and engineering applications, this data format is used. During standard uniaxial tensile testing, geometry of the sample, for instance the cross-section area, would change constantly. Occasionally it is required to know the instantaneous stress and strain in the sample. This data, known as true stress – true strain data (see figure on the side), is obtained by dividing the load by instantaneous cross section area. Standard formulas are used to derive this information. This method can be used up to the point of necking which coincides with ultimate load. Beyond this point, certain models of necking like Goodman model, are used to derive the true stress and strain data.
 Biaxial tension or stretching tests on the other hand are used to assess formability of materials. Again, two types of biaxial tensile tests, namely in plane and out of plane tests are available. In plane tests can be done using regular tensile testing frame with some additional fixtures to enforce constraints. Out of plane tests require separate test frames designed for such tests. Typical examples are dome tests, Ericksen cup 7 test, etc. These tests are most useful for assessing formality of sheet and plate materials. Typical examples where these types of tests are useful are car body panels, air craft panels, soda can, etc.
Specimen Geometry and Preparation
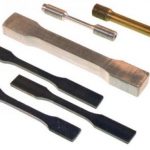 Most of the tensile testing is done on smooth round or rectangular bars. Occasionally the test may be conducted on notched samples to assess the impact surface defects like scratches, etc., on tensile properties. Specific details of dimensions are indicated in standards. The samples are machined from standard stocks like plate, sheet, and bars. Occasionally the samples may be extracted from shaped casting and forging at various locations in the part. The surface finish generally is fine milling or grinding followed by some polishing if needed.
Testing Conditions
Majority of tensile tests are done at ambient conditions. This gives the first level data for preliminary design. It is not un common that many structures and components are not used only at ambient temperature and environment. For example, turbine blades in a gas turbine engine operate at temperatures more than 1500C. Similarly, the drill pipes used in oil and gas drilling operations operate under high temperature and pressures. Another example is pipe lines transporting oil, and gas in arctic regions operate at colder temperatures. Thus, it is necessary to understand the behavior of materials under non-ambient conditions like very high temperatures or very low temperatures. At touchstone testing laboratory, we have specially designed environmental cell that facilitates testing materials 8 under extreme temperatures and environment. In addition, it is sometimes required to understand the behaviors of materials under high rate of loading. At touchstone testing laboratory, we have test frames which has cross head that can move as fast as 15” per min to understand the mechanical properties of materials.
Derivatives of Tensile Testing
There are several material properties testing that utilizes tensile testing mode. Some examples are Pin bearing strength testing, Lap shear testing, Fracture toughness testing, Tensile testing of weldments, Tensile impact test, Notch tensile test, etc.
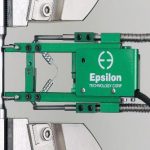
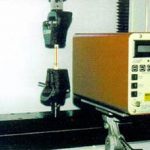 Capability – At TTL, we have a variety of test frames with load capabilities ranging from few millinewtons to 500 Kilo Newton. We have test frames with platforms up to 2’ x2’ and day lights up to 4’ to test full size components as well as large standard test samples. An array of strain gages, mechanical and laser extensometers, and digital image correlation units are used to measure displacements in multiple directions. In addition, we have several furnaces and cryogenic units where temperatures from -196C to 1500C can be used. We also several cells where atmosphere can be varied from neutral to humid to corrosive environment. We have conducted tensile testing of varieties metals, alloys, polymers, ceramics, glass, glass reinforced polymer composites, fiber reinforced polymers, biological implants, fibers of textile, carbon, and ceramics in single and tows. Many of our customers are well known OEMs from aerospace, automotive, oil & gas, mining and bio medical industries.
Some commonly used standards:
- ASTM C297 – Flatwise tensile testing of sandwich construction
- ASTM C565 – Tensile testing of carbon and graphite mechanical materials
- ASTM C1147 – Short term tensile weld strength of thermoplastics
- ASTM C1275 – Tensile testing of continuous fiber reinforced advanced ceramics
- ASTM D638 – Tensile testing of plastics
- ASTM D882 – Tensile testing of thin plastic sheeting
- ASTM D885 – Tensile testing of tire cords, tore cord fabrics and industrial filament yarns
- ASTM D3039 – Tensile testing of polymer matrix composite
- ASTM D3822 – Tensile testing of single textile fiber
- ASTM D3916 – Tensile testing of glass fiber reinforced rods
- ASTM E8 – Tensile testing of materials
- ASTM E21 – Tensile testing of materials at high temperature
- ASTM E238 – Pin bearing testing of materials
- ASTM E338 – Sharp notch tension testing of high strength sheet materials
- ASTM E345 – Tension testing of metallic foil
- ASTM E517 – Plastic strain ratio ‘R’ measurement
- ASTM E646 – Tensile strain hardening exponent of metallic sheet materials



Touchstone is committed to providing its customers with quality, reliable test results. That is why we have undertaken the rigorous steps needed to meet and secure the most stringent of test lab accreditations including ISO/IEC 17025, NADCAP 7101 (Materials Test Lab) and NADCAP 7122-I (Non-Metallics Materials Testing).
© 2024, Touchstone Testing Labs | Design by Wheelhouse Creative

